SECTIONAL VIEWS
What is a
sectional views:
Although it is imagined
that the object is cut by an imaginary section plane its interior construction
is viewed by removing the portion of the object between the observer and the
section plane while retaining its other portion. Then view of the retained
portion of the object exposing its interior construction along with its cut
surface is called sectional view. Thus it is a view which not only shows the
cut surface of the object but all other its interior details the section plane.
How to
obtain a sectional view:
To obtain a sectional view
of an object it should be imagined as though the object is cut by a section
plan and the portion of the object between the section plane and the observer
is removed as then looking in the direction normal to the section plane the
view of the retained portion of the object showing all the other visible
details along with the cut surface in drawn as since the process of sectioning
is only imaginary all other views of the object expect the sectional view are
drawn as if the object is uncut.
Types of
sectional views:
·
Full sectional view
·
Half sectional view
Full
sectional view:
 When a section plane is
passed through the central line of the object so as to it completely the
resulting sectional view is called full sectional view or simply sectional
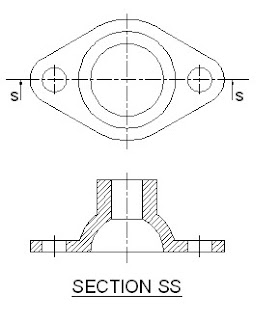
view. The object is cut
completely by the section plane SS passing rethought the horizontal central
line of the object. The view of the cut object when looking from the front becomes
the sectional view. Although it is appropriate to designate the sectional views
as sectional front, sectional top , sectional profile view, the Indian
standards institution recommends that should be designated by the word section
followed by the letters written in capitals which are used in naming the
section plane thus the sectional view of the object is called of sectional
front view.
Half
sectional view:
While drawing the full
sectional view of an object symmetrical about the center line there will be
repetition of drafting work in showing section on either side of the center line involving a good deal of drafting time and labor in such cases it will be advantageous
to draw the view of an object which shows only one half of the object in
section and the other half as unsanctioned and thus save the time and labor
without impairing the clarity of the drawing. A view of an object which shows
one half sections and the other half as unsanctioned is called half sectional
views. Since a half sectional view which only exposes the interior of the half
the object and shows the exterior of the other half its usefulness is therefore
limited only to symmetrical objects. It is not widely used in detail drawings
because of this limitation of symmetry and also because of dimensioning
internal details whose one half will be in sectioned zone and the other half
will be in unsanctioned zone an half sectional view is advantageous in assembly
drawing as it shows internal and external constructions in one view.


Comments
Post a Comment